|
|
|
Making a functional barrel helmet
Domingo de Valencia, Loch Cairn
Meridies
INTRODUCTION
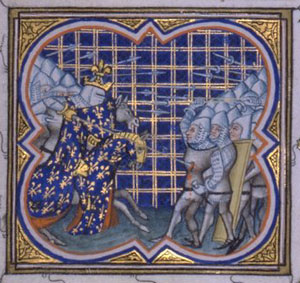
| The barrel helmet was a popular design from the time of the third crusade through the Fourteenth century. These helmets were used in wars, tournaments, and various battles with a fair amount of documentation. The first picture (above) is an example from the Battle of Mons-en-Pévèle: Philip the Fair fights the Flemish (1304). I will start by examining the build and advantages of this utilitarian and widely recognized helmet. It has also been know by the names "Great Helm", "Pembroke Helm", "Visby Helm" and the ever popular "Aircraft Landing Deck Helm." |
MECHANICS
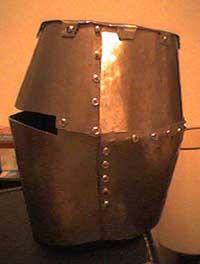
| The barrel helm gets it's name from it's shape. It resembles a cylindrical barrel/can. It was sturdy, made with a simple design, protected the face and had a bit of a glancing surface above the eyes to help deflect head shots. Besides the top, the helm I made was created using four 16 gauge plates. This type of helmet however could have easily been made with two or three plates, but at a cost. You would lose that glancing forehead plate and lose one of the helm's best features. Another disadvantage of this helmet is the way the face is protected. Fresh air is worth it's weight in gold on the battle field, and beathing holes (or cuts) MUST be added to prevent suffocation. The closed face design also makes fighting or wearing the helm seem most... seasonable. Well, Hot as Hell. |
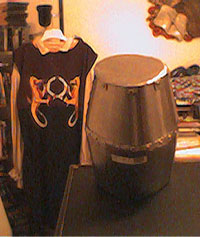
| This is the helm I created. Front view. 10-28-2000 |
CREATING THE HELM
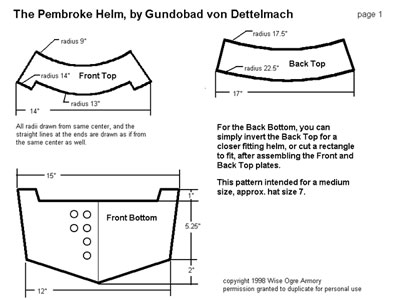
| The Helm that I created followed the pattern and introduction from Sir Polidor Haraldsson in his 1977 article, still located in the Known World Handbook. Though additional know-how was supplied by an article written by Gundobad von Dettelmach found in the essay section of the online "Armour Archive" located at http://www.armourarchive.com. However, real life credit must be given where it's due. The Honourable Lord Owain FitzMarshal provided valuable insight, and access to the tools needed to start this project. Sir Polidor's pattern, given in the Known World Handbook was an APPROXIMATE pattern. I tried enlarging the images when I found that they were not perfectly symetrical. Fold the pieces of the templates end to end to ensure symmetry. Here is a similar pattern for personal use only. The measurements are pretty close to those of Polidor's. As the image states, please duplicate only for personal use. Here's where it came from: http://www.armourarchive.com/pembrk.html |
| This brings me to an important step: MODEL the helmet! Take a sheet of cardboard from an old box and tape together the pieces with some masking tape. This will give you a good idea of whether or not the helmet you're putting together will fit you. This is a step that I failed to do. I did not take into account the different physiology of my own head, so now I have a helmet that won't fit me if I pad it for SCA combat. The finished product looks great, but I'll never be seen wearing it because of my haste. Take your time and don't forget to model/ or measure yourself and do the math if you prefer. |
| I began with a sheet of 16 gauge mild steel. You can find them at Lowes with the welding supplies. They also have 16 gauge sheets at the TSC Tractor supply. I traced the patterns onto the steel and then they were cut with a giant band saw in a metal working shop. Each of the pieces were sanded down and were ready for the forming step. |
| Starting with the top front, it was shaped to the contour of my head. We used a rubber mallet and banged the steel into shape using a stump and anvil. The next piece that was shaped was the top back. The piece of steel was shaped as the previous one had been done, with another twist... the top was flared in and the bottom flared out. This allowed a happy union between the front and back. When pounding the steel into shape, be mindful of the curves and use small hits so you don't wear yourself out. The form comes gradually and you can find the errors in shape as you work. The top shape with both plates becomes partially conical. |
| The bottom front was the next plate to be formed. The center was pressed to a crease and the sides were slightly bowed to create curves. The back plate was was bowed and the top was pounded about half an inch to set the top of the helmet into a "pocket." This idea on the building of the helm came from Sir Palidor's design. It prevents gapping of the helmet near the neck. |
| Before making the center (top) of the helmet, I assembled the entire thing. Holes were punched into the plates and while assembing, I used a drill to get the most accurate placement of the rivet hole. For this project, nuts and bolts were placed in rivet holes while going from one hole to the next. Clamps are also needed here to keep the plates in place. When assembling, I started with the entire back, this gave me plenty of room to rivet. I lined up the plates, drilled the hole and then riveted. After completing the back I riveted the 'top front' banging rivets from the inside of the helmet. I used a 1 pound ball-pien hammer. From here I connected the 'bottom front.' Everything fell into place nicely. |
| The flat top was traced from the connection of the two top (front and back) plates. I used the idea from Gundobad's design to create little rivetable flaps. This worked out nicely and now the helmet is done. |
 |
 |
 |
|
I hope that this webpage helps out! Nothing can compare to the satisfaction of making a home made helmet... except making your own signal horn... heheh. If you need help, or have questions (because much of this article is vague as it was written in haste) please e-mail me at: Domingo de Valencia
|